5.3.3 APPX Application Design Manual

+ Chapter 1-1: Overview of Application Design
+ Chapter 1-2: Getting Started
+ Chapter 1-3: Data Dictionary
+ Chapter 1-4: Understanding Process Design
+ Chapter 1-5: Interprocess Communication
+ Chapter 1-6: Customizing Your Application
+ Chapter 1-7: The Documentation Facility
+ Chapter 1-8: Application Design Tools
+ Chapter 2-1: Data Dictionary Overview
+ Chapter 2-2: Data Dictionary Concepts
+ Chapter 2-3: Domains
+ Chapter 2-4: Files and Fields
+ Chapter 2-5: Work Fields
+ Chapter 3-1: Overview of APPX Processes
+ Chapter 3-2: Getting Started
+ Chapter 3-3: Process Definition
+ Chapter 3-4: Menu Processes
+ Chapter 3-5: Job Processes
+ Chapter 3-6: Input Processes
+ Chapter 3-7: Output Processes
+ Chapter 3-8: Update Processes
+ Chapter 3-9: Query Processes
+ Chapter 3-10: Inquiry Processes
+ Chapter 3-11: Status Processes
+ Chapter 3-12: Subroutine Processes
+ Chapter 3-13: Table Processes
+ Chapter 3-14: Automatic and Optional Children
+ Chapter 3-15: Using the Image Editor
- Chapter 3-16: Using GUI Features of the Image Editor
+ Chapter 3-17: Using Event Points
+ Chapter 4-1: ILF Integration
+ Chapter 4-2: True/False Status Indicators
+ Chapter 4-3: Specifying Statements
+ Chapter 4-4: The ILF Editor
+ Chapter 4-5: The Appx ILF Debugger
+ Chapter 4-6: ILF Keyword Reference
+ Chapter 4-7: Predefined Fields
+ Chapter 4-8: Runtime Subroutine's and Predefined Processes
+ Chapter 4-9: Appx Chart Director API

Chapter 3-16: Using GUI Features of the Image Editor

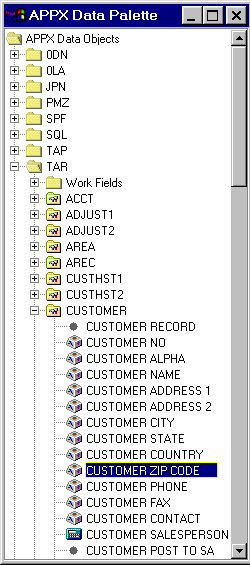
Editing or Defining Data Objects for Images


The Data Palette is only used to add new data objects to an image. Activate the Data Palette by selecting the Data Palette option from the Image Editor toolbar. Available APPX applications are listed in the APPX Data Options sections of the Data Palette. Double-click one of the applications listed to expand the list to Work Fields and file names. Double-click Work Fields to view a list of the application?s work fields, or double-click a file name to view a list of fields defined within the chosen file. Using the left button of your mouse, click the desired field name and drag it to the desired location on the image (position the pointer to where you want the first character of the field to be placed). See below. Release the mouse button to insert the field.

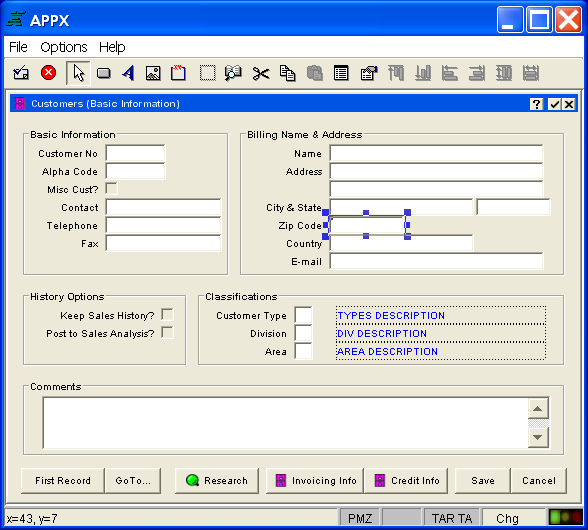
Selecting Data Object

The following screen shows the image after inserting the new field and clicking on it to select it.

Using the Data Palette to Paint Objects on an Image

The selected data object will be painted on the image using its default attributes. If you want to change those attributes, simply double click on the object or select the object and then select 'Edit Object Properties' from the toolbar. To remove it from the image, select the object and then select 'Cut Selection' on the toolbar.

Application Design Manual                                         "Powered by Appx Software"

445

©2006 By APPX Software, Inc. All Rights Reserved